Jetpack Compose – Android’s Toolkit to Develop Native UI

Google is leaving no stone unturned in improving its services and products from launching Android 10 to deprecating Android’s AsyncTask.
It intent became all the more evident when Google, in the Android Dev Summit 2019, announced that the company is going to add Jetpack Compose in the Android Studio 4.0.
Before heading on to how Jetpack Compose works, let us discuss what it is.
What is Jetpack Compose?
It is a declarative reactive UI system for Android. It eliminates the need for XML layouts and is an amazing tool for Android app developers who are new to Android projects.
Android developers can call Jetpack Compose functions in order to represent elements, and the rest will be done by the compiler. Meaning, you can actually use many functions (known as composable functions) to programmatically describe the UI.
In order to do so, you interpret functions with the Composable tab, which commands the compiler to make the boilerplate code. This saves time along with keeping the code understandable and simple.
Although you cannot add functions within the flow of the code, you can definitely make a Compose Activity template, where you can add more elements.
Hello World with Jetpack Compose
To get your hands on Jetpack Compose for Android, you can go to the Android Develops website. However, you need to keep it in mind that it is a preview software as of now, so there may be little tweaks in it in the future version.
You can either start with a new project or add Compose to the existing one.
What is amazing in the Compose is that it enables developers to preview live changes. In order to do so, you need to add a second tag preview for any action or functions. This way you can see what you have built so far.
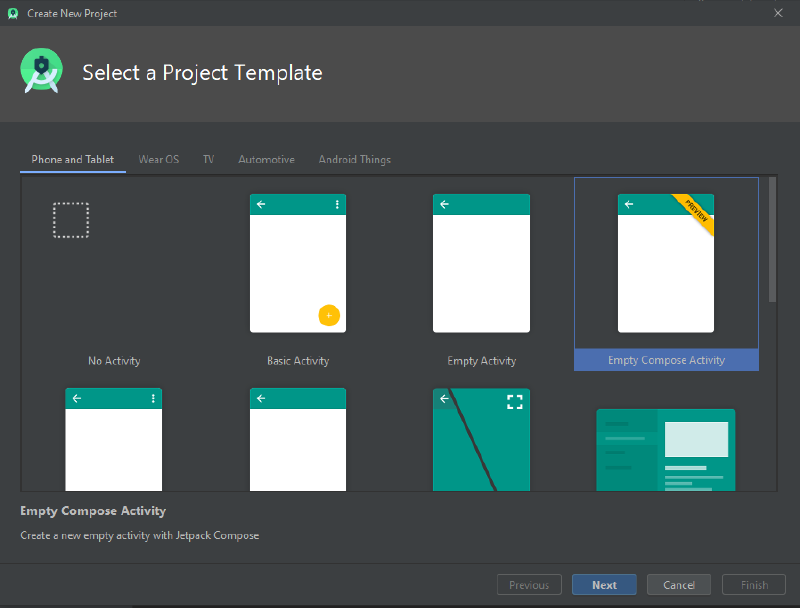
Now, if you choose to start with a new project, you will see a sample code appear on the screen looking like this –
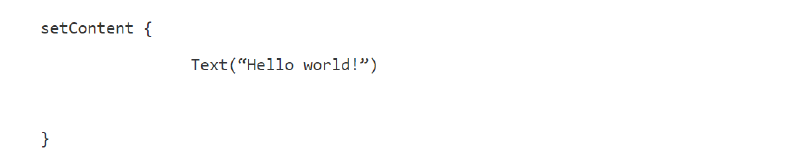
Here, the ‘setContent’ block sets up the design of the activity and you have a simple block of text.
This example expands further and encloses how to use a composable function with the Composable annotation. It looks something like this-
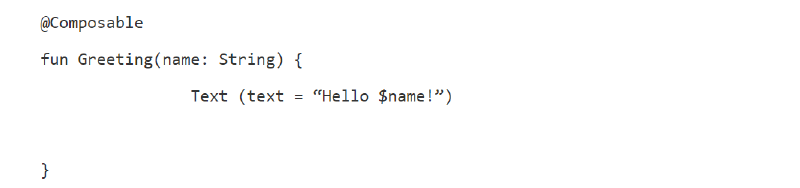
At this point, you are allowed to call this function to change the name on the label. But mind that you can only do so from within the scope of other composable functions.
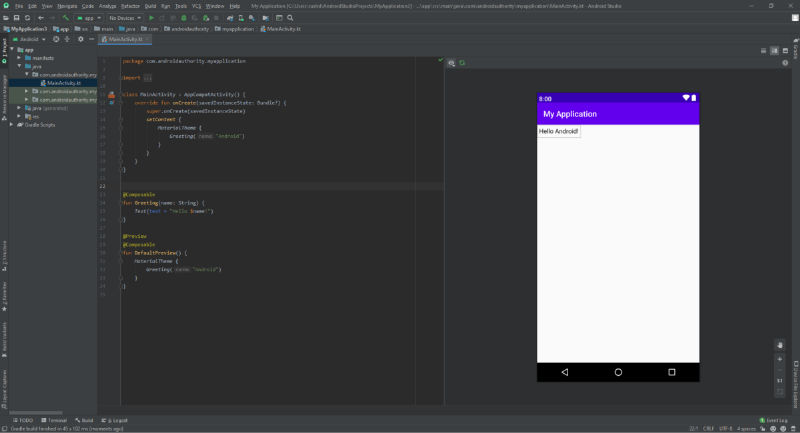
We cannot necessarily call it a UI, for it is more a piece of text so far. To take this process further, we will add some functions.
One of the many functions is the Column(). This separates the different elements in a column layout. To create a more elaborative layout of text and buttons, you can employ rows.
This is the code for adding a button-
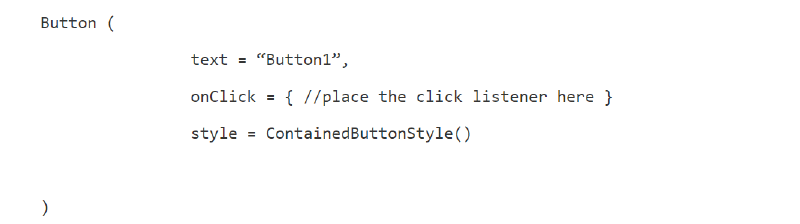
What is noteworthy is that the tag ‘ContainedButtonStyle()’ will deliver you the Material Design in the initial stage.
You can add graphics with the help of the ‘DrawImage()’ tag. Moreover, a HeightSpacer is going to assist you in separating elements with gaps and other tools will help you in padding and aligning numerous elements.
This was just a sneak-peek into Jetpack Compose. If you need in-depth information on the same then you can check out Google’s documentation.
Though Jetpack Compose is an amazing tool for creating UI Designs, there are still some areas that need improvement i.e., it is only Kotlin-based as of now which might be an impediment for other developers who are not that fluent with the language.
strategies your digital product..


